| tags: [ series infrastructure ]
Building a Homelab - Part 1: Hardware
At its core, a homelab is nothing more than a set of computers networked together to provide an environment for experimentation. I’m a big fan of self-hosting services, and I’ve written previously about this. But I wanted to take this a step further and set up a compute cluster. I’ve often wondered about how the “cloud” works, and having some hardware will allow me to experiment with building my own. This will be a series of posts documenting my building of a homelab.
Hardware
I live in a small apartment, and having worked with rack-mount servers, I did not want to bring these home. They are loud, power inefficient, take up a lot of space, and generate a lot of heat.
After doing some research I found that I had 2 options: NUCs and small form-factor (SFF) desktop computers. And while NUCs win in size, they lose out in cost and upgrade path: with comparable CPU and RAM they were more expensive and less upgradable than the desktop computers, and this is partly because you could get refurbished business desktops from wholesalers. Indeed, buying refurbished business gear is a great way to get compute on the cheap. One of my original servers is a Thinkpad X230 laptop that I bought refurbished and has been serving me kindly since.
Ultimately, I ended up with 3 small form-factor computers. These will become hypervisors and the core of the cluster I’ll be building out. I went with 3 because that’s the minimum number of nodes needed to create a high-availability cluster in Proxmox, our virtualization platform of choice. Since these machines will be VM hosts, they will need to have a sizable amount of RAM, so I upgraded that and added an SSD to each:
| CPU | RAM | Storage | |
|---|---|---|---|
| HP Elitedesk G2 | i7-6700 | 64GB | 1TB SSD + 1TB HDD |
| Dell Optiplex 3050 | i5-7500 | 32GB | 1TB SSD + 500GB HDD |
| Dell Optiplex 5040 | i5-6500 | 32GB | 500GB SSD + 750GB HDD |
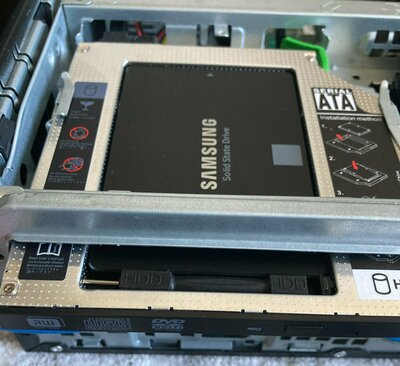
And since we won’t be using CDs or DVDs, we can replace the optical bay with an
SSD caddy for additional space:

For storage, I’ve had a Synology NAS for a while now that I’ve been using for local backups and as an network file store.
To network everything together, I use a Cisco Catalyst 2960g 8-port switch. The choice of switch was mostly for learning purposes. I wanted the most ubiquitous enterprise-grade switch, and this undoubtedly has to be something made by Cisco. I’ve also been learning computer networking and reading up on network automation. This switch is also used in the examples in the book I’m reading, so that made the choice relatively easy. Perhaps in the future, when the lab is more fleshed out and I start to rely on some of the services I use on it, I will upgrade it to something more recent.
For routing, I am using a MikroTik hAP ac2 acting also as an access point. I originally got this when I first moved into the apartment and RouterOS (the software running on the router) is very feature-rich, albeit has a steep learning curve. Eventually, I’d like to transition routing to OPNsense running separately and switch the hAP to be strictly an AP. One last factor into picking networking gear, I needed to be able to provision it through the command line.
Next step
Now that the hardware is ready, the next step is to network everything together. This will involve stratifying my (currently flat) home network to separate VLANs so that the lab can sit in its own network. Tune in next time!