| tags: [ projects infrastructure ]
Raspberry Pi as Home Server and Reverse Proxy
Introduction
Raspberry Pis are a great, low-risk introduction into Linux server and system administration. If you end up bricking it, you can just restart the whole process.
In this tutorial, we will go over how to turn the Pi into a home server that can be accessed via the internet, and how to use it as a reverse proxy for other services on the Pi and local network. This includes:
- Assigning a static IP address on the local network using
dhcpcd - Setting up dynamic DNS with a custom domain name
- Using Nginx as a reverse proxy to other services
- Setting up SSL with Let’s Encrypt
Note: This post assumes that you are able to ssh into your Pi on your
local network. If not, I recommend you head over to the official
documentation to
learn how to do so. Also, basic knowledge of the command line will be helpful
(especially editing files).
Setting up a static IP address
The most important part in this whole process is having a static IP address for our Pi on the local network. This allows a couple things: we do not have to lookup the Pi’s IP address if the network or the Pi goes down, and the router will know how to forward requests to the Pi from the internet.
Our router usually assigns an IP address for us when we connect to it using
DHCP1. In order to set up a static IP address using dhcpcd, we’re going to
need to find out what networking interface the Pi uses as well as collect 3 IP
addresses:
- Gateway
- DNS
- Pi’s
First, let’s find the address of our gateway (in the case of a regular home
network, this would be our router). ssh into the Pi, and run this command:
$ route -n
The output should look similar to this:
Kernel IP routing table
Destination     Gateway         Genmask         Flags Metric Ref    Use Iface
0.0.0.0         192.168.1.1     0.0.0.0         UG    0      0        0 eth0
127.0.0.0       0.0.0.0         255.0.0.0       U     201    0        0 lo
Our gateway will be the address listed on the first line under the Gateway
column, in my case it is 192.168.1.1.
Next, we’re going to need our DNS address. This can be found by running this command:
$ cat /etc/resolv.conf
The IP address will be located after nameserver.
Finally, let’s grab our Pi’s address(es) as well as the network interfaces. We can find that by running this command:
$ ip -4 addr show | grep global
The output will look something similar to this:
inet 192.168.1.8/24 brd 192.168.1.255 scope global eth0
inet 192.168.1.9/24 brd 192.168.1.255 scope global wlan0
The Pi’s IP address will be the second piece of info (192.168.1.8/24), and
the interface is the last word on each line (eth0 and wlan0). You might
have just one line, that’s OK. This just depends on how your Pi is connected to
the network. For each line, make sure you grab the IP address as well.
We’ve collected all the puzzle pieces. Now let’s edit our dhcpcd
configuration file which can be found at /etc/dhcpcd.conf, and add the three
pieces of info we’ve collected (just put it at the bottom):
interface eth0
static ip_address=192.168.1.8/24
static routers=192.168.1.1
static domain_name_servers=192.168.1.1

interface wlan0
static ip_address=192.168.1.8/24
static routers=192.168.1.1
static domain_name_servers=192.168.1.1
ip_address is the Pi’s address, routers is the gateway address, and
domain_name_servers is the DNS address.
All set now – this will be the IP address you can use to ssh into the
Pi2. Reboot the Pi and let’s move on to setting up dynamic DNS with a custom
domain name.
Setting up dynamic DNS with a custom domain name
Before we setup dynamic DNS (DDNS for short), we should backtrack a bit and do some proper introductions. If you remember in our first step, you may have noticed that our Pi’s IP address gets reassigned every time we reconnect it to the local network. Reassignment also happens to our router’s public IP address by our ISP, and the frequency is undetermined but can be frequent. Here’s a simple diagram to illustrate:
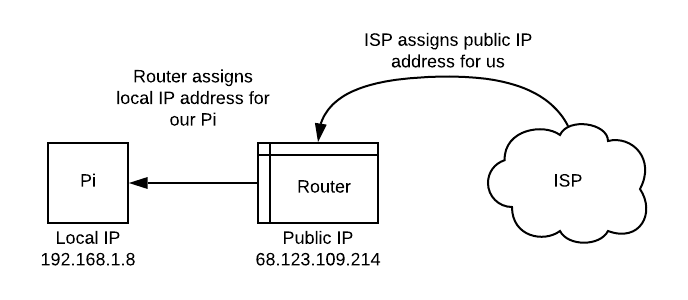
Our router’s public IP address is also the only address seen from the internet, this means that all the devices connected to our local network will have the same public IP address3. So you’re probably wondering, how does a response know to come to our computer vs. our roommate’s? This is the job of our router! It routes requests and responses based on our local IP address and port.
This poses a problem: if we want to connect to our Pi from the internet, we need to know the public IP address of our router (and therefore our Pi). Rather than having to constantly look up the public IP address, we can utilize dynamic DNS to help us here. DDNS services work by monitoring our public IP address for changes. When the address changes, the service updates our account with the new IP address. These services will map domain names (something like “www.google.com”) to IP addresses so that visiting that domain name will always take us to the correct IP address no matter how many times it changes.
We’re going to take a timeout here and make sure that our Pi is connectable via the internet. In order to do this, we need to open up some ports on our router.
Port forwarding
This step is highly dependent on your router. Most routers also block port
80 by default.4 But essentially, we need to login to our router from our
local network by typing in the gateway address into our browser. This should
present some sort of interface for our router. It will ask for a username and
password, this is usually admin/admin, but search the internet for your
router model and see how to login. What we want to do is port forward the ports
80, 443, and 225 to the IP address of our Pi. If need be use this
website to find your router model and how to port
forward.
Once setup, you can test out this works by attempting to ssh into your Pi
using your public IP address rather than your local IP address. Okay, let’s
go back to setting up dynamic DNS.
DDNS client
There are plenty of services online that offer free DDNS, but they have limitations in that you can’t just use any domain name. If you’d like to use a custom domain name, it’s best to go register one through sites like namecheap or gandi. Most often, these companies are also DDNS service providers so adding DDNS for a domain is simple configuration. We will use namecheap moving forward.
Alright, so now that we have our custom domain, how do we go about broadcasting to the DDNS service provider when our IP changes? This is the job of the DDNS client.
Luckily for us, there exists a tool that will help us do this (and
automatically). We will use ddclient to manage for us. Here’s an abridged
version of this blog post:
- Login to namecheap and enable DDNS for your domain. It should be under
Advanced DNS. You’re going to get a really long password. Save it, we’ll gonna need it in a bit. - Add a new
A + Dynamic DNS record, with an entry to127.0.0.1as placeholder. - Install
ddclient:
$ sudo apt-get install ddclient
- Modify
/etc/ddclient.conf, here is mine for example:
# Namecheap
use=web, web=dynamicdns.park-your-domain.com/getip
ssl=yes
protocol=namecheap
server=dynamicdns.park-your-domain.com
login=<your-domain-name.com----change-me>
password='<password-from-step-1----change-me-2>'
@
Leave protocol, web, and server alone.
- Remove the cache of the original config and restart
ddclient:
$ sudo rm /var/cache/ddclient/ddclient.cache
$ sudo ddclient
- Start the
ddclientdaemon:
$ sudo service ddclient start
If you succeeded in all of the above steps, your Pi should now be reachable via
your domain name. You can test this out by trying to ssh with your user
@domain.name (assuming you opened port 22).
If you want to test out if port 80 is open, ssh into your Pi, and run:
$ python -m SimpleHTTPServer 80
Visit your fresh new domain in your browser. This should print out the current
directory from which you ran your Python command. You may have to sudo if you
get an error.
We now have the capability of running a server that we can connect to from the outside internet. Great success!
Reverse Proxy (using Nginx)
We got a server up and running in the last step. But what if we want more than one server to be doing things? What about if we want some other machine to be connected to the internet through our Pi? And what if we want each one to have its own domain name? This is the job of a reverse proxy. It acts as the first point of contact from our router and will forward requests to their respective server. This is where it fits:
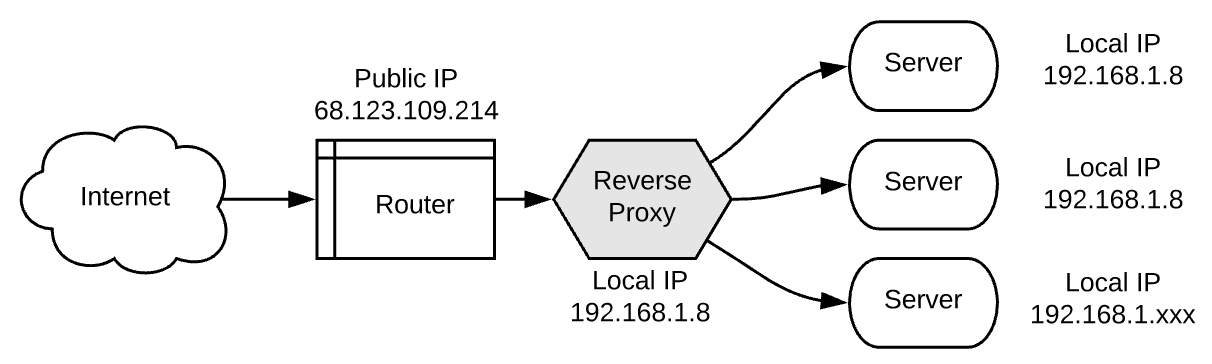
This also demonstrates why it’s called a reverse proxy. It acts in reverse of a normal proxy!
We will use Nginx as our reverse proxy. First let’s install and run it:
$ sudo apt-get update
$ sudo apt-get install -y nginx
$ sudo service nginx start
If nginx has started, you can point your browser to your domain and it should
give you the nginx logo.
Configuring Nginx to act as reverse proxy
Nginx configuration files sit in /etc/nginx/conf.d/, to start, we can edit
/etc/nginx/conf.d/default.conf to get something basic going. Writing a decent
nginx conf file is an art form in itself and can be very nuanced. If you
want to learn more about Nginx, I highly recommend you check out
Servers For Hackers guide on setting up Nginx.
Here’s an annotated simple reverse proxy configuration:
# Each server block consists of configuration for a server
server {
  # The server_name is the domain name
  server_name lumpi.host www.lumpi.host;

  # You can define multiple locations, in this case it is root
  location / {
    root /var/www/lumpi.host;
    index index.html;
  }

  ###### Proxy server at http://lumpi.host/cats/
  # Any requests made to http://lumpi.host/cats/ will be proxied
  # to the server running on http://localhost:1234
  location /cats/ {
    proxy_pass http://localhost:1234/;
  }

  # This server is listening on port 80
  listen 80 default_server;
  listen [::]:80;
}

# This can be used to define a cluster of servers by a name
# that can be referenced by the `proxy_pass` directive
upstream piratefsh {
  server localhost:5678;
}

# Server block utilizing upstream piratefsh service
server {
  server_name piratefsh.club www.piratefsh.club;

  root /home/aos/piratefsh;
  index index.html;

  listen 80;
  listen 443 ssl;

  # Compression
  gzip on;
  gzip_types application/javascript image/* text/css;
  gunzip on;

  location / {
    # We proxy to our upstream service
    proxy_pass http://piratefsh;
    proxy_set_header  Host            piratefish.club;
    proxy_set_header  X-Real-IP       $remote_addr;
    proxy_set_header  X-Forwarded-For $proxy_add_x_forwarded_for;
  }
}
This is just a simple example of a configuration. A proxy to another server is
defined by the proxy_pass directive followed by the location of the server.
You can also specify something else on the network that is not on localhost.
Setting up SSL
SSL stands for Secure Sockets Layer. This technology makes sure that any
traffic between our sites and users is encrypted. We can use LetsEncrypt to
get an SSL certificate and allow us to use https. This process is relatively
painless with certbot, you can follow along here or on the main certbot
website:
- Install
certbot:
$ sudo apt-get install certbot python-certbot-nginx
- Run
certbotand have it modify yournginxconfiguration to add the certificates:$ sudo certbot --nginx - Restart Nginx:
$ sudo service nginx restart
All good now. certbot comes with with an automatic renewal script for the
certificates so we don’t have to deal with that. Now test that certbot worked
by visiting your site with https://.
Finally, let’s forward all http:// requests to https://. Open up your nginx
conf file again and add this at the top:
server {
  listen 80 default_server;

  server_name _;

  return 301 https://$host$request_uri;
}
Make sure you remove default_server from any other server block or else
this won’t work. If you’re still having trouble, you can do this instead:
# Add this inside each server block
if ($scheme = http) {
  return 301 https://$server_name$request_uri;
}
Be careful with if statements in Nginx configuration files, it’s evil.
Fin
And that’s it! We’ve successfully put a Pi up as our home server on the internet and are now using it as a reverse proxy. This was only a very shallow introduction to the world of Ops and servers. As for next steps, I recommend putting a server up there that serves something fun and useful to you. Then learn to start monitoring it. Hope you enjoyed this as much as I enjoyed writing it!
-
DHCP stands for Dynamic Host Configuration Protocol. It is responsible for the dynamic assignment of IP addresses. In this case our router is the DHCP server, and we will be using
dhcpcdto tell the router what IP address we would prefer. ↩︎ -
A nice side-effect of having a static IP is that now we can add our Pi as a host in our ssh config to enable a “shortcut”. So we can do
ssh pito ssh into the Pi. Here’s a simple tutorial on this. ↩︎ -
This is known as network address translation. ↩︎
-
Once you open this port (and the ports listed below), you are creating a security hole into your local network. So be careful, and make sure that whatever will be listening on port
80doesn’t expose your file system or other things you don’t want bad people to touch. ↩︎ -
Note: for port
22, our SSH port, I highly recommend that you pick a random large incoming port rather than22. Then forward this port to22. Then whensshing to the Pi from outside the local network, pass in the random incoming port and if port forwarding is set up correctly, it should let you into your Pi! This is security via obscurity as there are a lot of random drive-by port scans on22. It’s a wild west out there. ↩︎