| tags: [ infrastructure nix elixir ]
Building an Elixir App Around a Zigbee Button
I have an IoT button (SONOFF wireless push button) that when pressed I want to save the value in a database for later tracking. In this post - I document my journey yak-shaving my way to get exactly what I’m looking for.
TL;DR
Zigbee
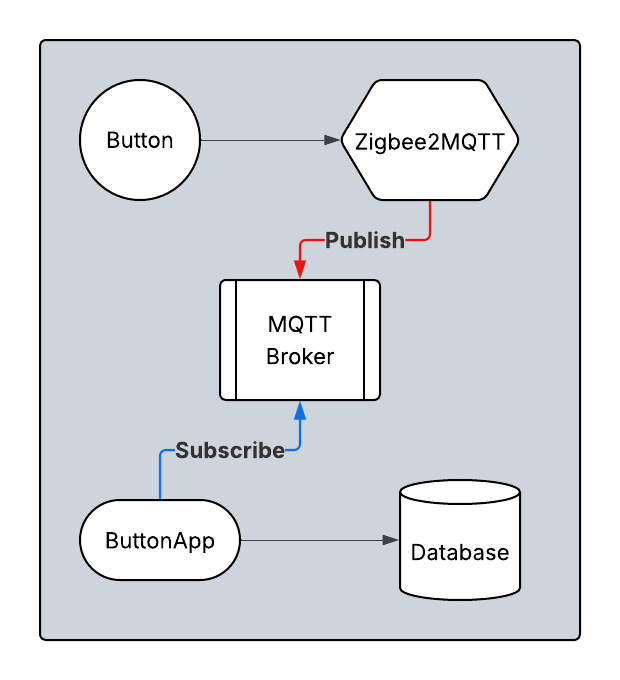
While I’ve previously set up a wifi-based smart plug, I have no experience with these buttons. This particular button uses the Zigbee protocol for communication. I also have a Zigbee gateway purchased along with the button (ConBee II). The whole process involves registering the button to the gateway then accessing its actions.
There exists a Python library to interact with Zigbee and this gateway directly, but I didn’t choose to go with this for two reasons. I wanted to write my code in Elixir and I wanted a more robust solution in case I decide to add additional devices.
Digging deeper, this is when I found zigbee2mqtt. It bridges Zigbee to MQTT. As MQTT is just pub-sub under the hood, I thought this would be a good choice. Zigbee2MQTT turned out to be a whole application that allows registering and configuring devices. I connected the Zigbee gateway USB to one of my servers, then brought up the Docker image using Nix OCI containers:
# zigbee.nix

virtualisation.oci-containers = {
  containers = {
    zigbee2mqtt = {
      image = "ghcr.io/koenkk/zigbee2mqtt:2.5.1";
      autoStart = true;
      environment.TZ = "America/New_York";
      volumes = [
	    "/etc/zigbee2mqtt/data:/app/data"
	    "/run/udev:/run/udev:ro"
      ];
      extraOptions = [
	    "--network=host"
	    "--device=/dev/ttyACM0:/dev/ttyACM0"
      ];
    };
  };
};
I didn’t need to put the container on the host network, but in this case it was
the quickest way to get up and running. I also passthrough the Zigbee gateway
into the container with --device option.
On loading up Zigbee2MQTT, it looks like it can’t act as an MQTT broker, so we need to run our own.
MQTT Broker
From my research, the two options I saw for running an MQTT broker were
mosquitto and emqx. Mosquitto seems to be the simpler and leaner of the
two, but I saw that emqx offered a Postgres “connector”. Ultimately, I wanted
my button to store the clicks in a database so figured this would do the trick!
Bringing up emqx was relatively uneventful. I planned on running the MQTT
broker on my Kubernetes cluster and saw that it has a Helm chart. It was nice
to be able to fully configure it via YAML, including creating a custom iot
client. (They also have a Kubernetes operator for clustering and high
availability, but I didn’t need any of that.)
The final config looked something like this:
# values.yaml

ingress:
  dashboard:
    enabled: true
    ingressClassName: nginx
    hosts:
      - dashboard.mqtt.${CLUSTER_DOMAIN_INTERNAL}

extraVolumeMounts:
  - name: bootstrap-clients
    mountPath: /opt/emqx/etc/auth-built-in-db-bootstrap.csv
    subPath: EMQX_CLIENT_BOOTSTRAP_FILE
    readOnly: true

extraVolumes:
  - name: bootstrap-clients
    secret:
      secretName: emqx-prod-secrets

emqxConfig:
  EMQX_AUTHENTICATION__1__ENABLE: true
  EMQX_AUTHENTICATION__1__BACKEND: built_in_database
  EMQX_AUTHENTICATION__1__MECHANISM: password_based
  EMQX_AUTHENTICATION__1__USER_ID_TYPE: username
  EMQX_AUTHENTICATION__1__PASSWORD_HASH_ALGORITHM__NAME: bcrypt
I did run into an issue testing this out. Try as I might, I couldn’t connect to
the MQTT broker from outside the cluster! Originally, I had set up ingress for
mqtt.example.lan for port 1883 but after some digging, I realized two
things:
- the
mqttprotocol works at the TCP level ingress-nginx(my Kubernetes ingress of choice) doesn’t play too well proxying anything below HTTP
I found this article
about exposing TCP/UDP services outside the cluster. The gist of it is that nginx supports a ConfigMap for TCP and UDP services, with a key-value pair being the port to open and the Service to proxy to. Thankfully, the Helm chart abstracts this to a value and for emqx, it was:
values:
  tcp:
    "1883": "default/emqx:1883"
After setting this up, I was able to test this out locally using the
mosquitto-cli and it worked! I configured Zigbee2MQTT to use this broker and
it successfully connected.
Elixir App
With the “base” infrastructure up and running, we can press the button and
it shows up as a message on the MQTT topic: zigbee2mqtt/button/action. All we need to do now
is to hook up our application to this MQTT broker and react to the button
press.
The app itself is pretty simple: subscribe to the MQTT topic, press the button, send action to a Postgres database. You would think that something like this already exists, but at least with EMQX, it’s gated behind an enterprise license…
I decided to use Phoenix as the “framework” to build the app, stripped down to the bare minimum. This removes practically the whole frontend and is great for API-only applications:
$ mix phx.new button_app --no-assets --no-html --no-mailer --binary-id
(--binary-id is used to assign UUIDs to DB records and is probably overkill
here, but I generally default to that nowadays.)
I used Ecto to create the DB table schema:
# lib/button_app/count.ex

defmodule ButtonApp.Count do
  use Ecto.Schema
  import Ecto.Changeset

  @primary_key {:id, :binary_id, autogenerate: true}
  @foreign_key_type :binary_id
  schema "counts" do
    field :action, :string

    timestamps(type: :utc_datetime)
  end

  @doc false
  def changeset(count, attrs) do
    count
    |> cast(attrs, [:action])
    |> validate_required([:action])
  end
end
The next step was to hook into the MQTT broker. I found there were no good
Elixir-native MQTT libraries, but thankfully we can hook into the Erlang
ecosystem and there was one by the creators of EMQX:
emqtt.
Let’s first create some runtime configuration for MQTT:
# config/runtime.ex

config :button_app, :emqtt,
  host: System.get_env("MQTT_HOST", "mqtt.example.lan"),
  port: 1883,
  username: "iot",
  password: System.get_env("MQTT_CLIENT_PASSWORD"),
  clientid: "button_counter",
  clean_start: false,
  name: :emqtt

config :button_app, :topic, "zigbee2mqtt/button/action"
We can then retrieve this within our module like so:
emqtt_opts = Application.get_env(:button_app, :emqtt)
topic = Application.get_env(:button_app, :topic)
The emqtt documentation says to use a GenServer to run the client and
messages come in the form of a {:publish, payload}:
# lib/button_app/subscriber.ex

defmodule ButtonApp.Subscriber do
  use GenServer

  def start_link([]) do
    GenServer.start_link(__MODULE__, [])
  end

  @impl true
  def init([]) do
    emqtt_opts = Application.get_env(:button_app, :emqtt)
    topic = Application.get_env(:button_app, :topic)
    {:ok, pid} = :emqtt.start_link(emqtt_opts)

    state = %{
      topic: topic,
      pid: pid
    }

    {:ok, state, {:continue, :start_emqtt}}
  end

  @impl true
  def handle_continue(:start_emqtt, %{pid: pid, topic: topic} = state) do
    {:ok, _} = :emqtt.connect(pid)
    {:ok, _, _} = :emqtt.subscribe(pid, {topic, 0})
    {:noreply, state}
  end

  @impl true
  def handle_info({:publish, payload}, state) do
    # ButtonApp.add_count(payload) # unimplemented
    IO.inspect(payload, label: "mqtt_payload")
    {:noreply, state}
  end
end
We handle receiving the message via the handle_info call. Running the
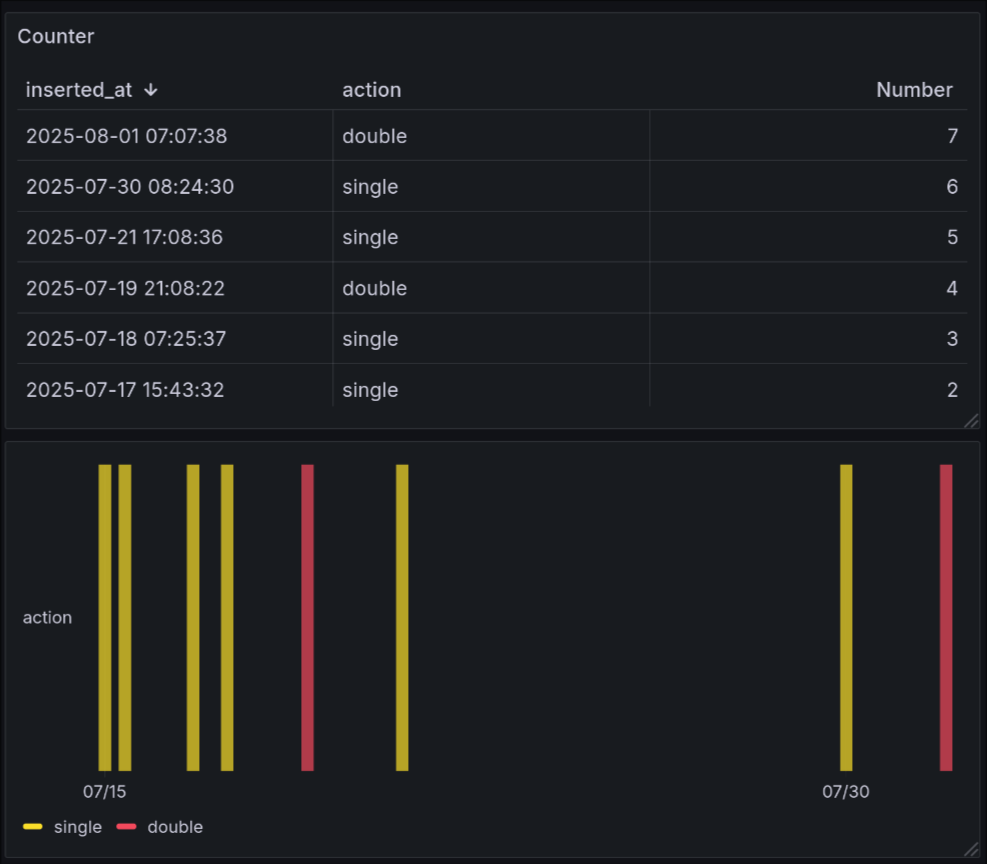
application and pressing the button, I was able to receive a message!
mqtt_payload: %{action: "single"}
It looks like the “action” is the type of button press, as the button itself can register different types: “single”, “double”, “long”.
Now all we need to do is implement ButtonApp.add_count() and just send it to
the database. With Ecto - this is pretty easy:
# button_app.ex
alias ButtonApp.Count

def add_count(payload) do
  %Count{}
  |> Count.changeset(%{action: payload})
  |> Repo.insert
end
I tested this out and I was able to see a new button press registered in my development database. Now let’s ship it!
Deploy it!
Phoenix has a nice mix task that auto-generates a Dockerfile for us.
mix phx.gen.release --docker
The only thing it doesn’t do is auto-migrate the database when deploying, so let’s fix that by adding the migrate script:
# Dockerfile
# ... some other things

CMD ["sh", "-c", "/app/bin/migrate && /app/bin/server"]
We build this image and can now deploy it via a Nix OCI container:
virtualisation.oci-containers = {
  containers = {
    button_app = {
      login = {
	    registry = "https://registry.example.lan";
	    username = "mei";
	    passwordFile = config.sops.secrets.registry_password.path;
      };
      image = "registry.example.lan/registry/button_app:latest";
      environmentFiles = [
	    config.sops.templates.button_app_env.path
      ];
      extraOptions = [
	    "--pull=newer"
	    "--network=host"
      ];
    };
  };
};
I probably could have deployed this to my Kubernetes cluster since it doesn’t need to be on the host network and can talk directly to the MQTT broker in-cluster.
I also run Grafana - so I hooked it up to the database and after a few times clicking the button, we can now do a visualization.
Outro
I could have just put all of this on a little box and sent it, but I wanted something that I can expand into for the future if I want to build more apps. I also skipped talking about setting up the database, Docker registry, and Nix secret management because I think they would have distracted from the overall post. Perhaps in the future I can go over those in more detail.
This was a fun deep dive into what it takes to hook up an IoT button to a full Elixir application, and the surrounding infrastructure that’s required for a more “production”-like deployment.